 Appetizers
 Dinner
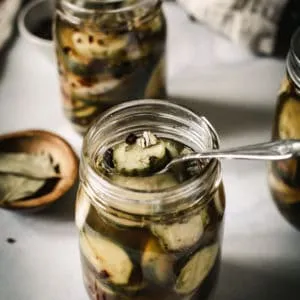
Sweet and tangy with a slight crisp, these Refrigerator Bread and Butter Pickles make a delicious condiment for any table or sandwich. No canning equipment is needed to prepare this pickled side.
You can easily can these pickles though and I’ll show you how in this post. If you’re wanting to start canning this Apple Butter and Apple Pie Filling are easy beginners recipes to try as well.

Bread and Butter Pickles
Crispy, crunchy, slightly sweet, and slightly savory, these bread and butter pickles are one of my favorite sides and my daughter begs for them every time we visit the farmers market. You can store them by canning or keep them in your fridge for easy snacking.
Pickles are a treat I prefer to indulge in all year long. As the end of summer nears you’ll find the very best pickling cucumbers. Canning them into dill or bread and butter pickles is not only becoming a treat but a passion of mine.

How to Make Pickling Spice
Pickling spice is sold in grocery stores so there is no need to purchase all of the below ingredients if you don’t already own most of them. However, if you love pickling and love bread and butter pickles then I highly suggest making up some of your own. Most of these spices are ones I use regularly.
- Yellow Mustard Seeds
- Brown Mustard Seeds
- Whole Allspice
- Coriander Seeds
- Whole Cloves, crushed
- Bay Leaves, torn
- Ground Ginger (optional)
- Crushed Red Pepper Flakes (optional)
- Celery Seeds (optional)

Canning Refrigerator Bread and Butter Pickles
Canning these refrigerator pickles isn’t necessary, however, if you’d like to have some on hand and in stock, the process steps are below. I recommend doubling the recipe below to end up with 6 half-pint jars instead of just 3 for all the work you’ll be doing during the canning process.
PREPARE THE JARS
- Fill a canning water bath with water to the fill line and place it on the stove set to HIGH.
- Clean the jars and lids (the bands don’t really need to be washed) with warm soapy water and rinse.
- Place the jars into the water to warm before filling with the hot liquid.
FILL THE JARS
- Pack the pickles into each jar leaving 1/2-inch headspace and pour the hot pickling liquid on top, not filling past the 1/2-inch headspace.
- Using a flat spatula remove the air bubbles from the jar by gently sliding the spatula around the inside of each jar. Wipe the rims of the jar.
- Place the lid on top of each jar and screw on the band until fingertip tight.
CANNING THE PICKLES
- Bring the water bath to a boil and carefully lower the jars into the water using tongs.
- Process in the boiling water canner for 15 minutes. Remove from the water and place on a towel to cool for 12 hours before removing the bands.
For the best flavor allow the cans to sit for 4 to 6 weeks. Place in the refrigerator to chill before opening and serving. The remaining jars, if canned properly, can be stored in a pantry until time of use.

Bread and butter pickles work well on sandwiches and burgers but are also a delicious condiment to add to any table gathering. Thanksgiving and Christmas dinner are probably my two favorite times to serve these pickles.
Other Delicious Condiments to Try
Refrigerator Bread and Butter Pickles Recipe
Ingredients
- 3 lbs Kirby Pickles sliced 1/4-inch thick
- 1/2 medium White Onion sliced thin
- 1/4 cup Salt
- 2 cups White Vinegar
- 1/2 cup Apple Cider Vinegar
- 1/2 cup Brown Sugar
- 1/2 cup Granulated Sugar
Pickling Spice
- 1 tablespoon Yellow Mustard Seeds
- 1 tablespoon Brown Mustard Seeds
- 1 tablespoon Whole Allspice
- 2 teaspoons Coriander Seeds
- 2 Whole Cloves crushed
- 4 Bay Leaves crumbled
- 1 teaspoon Ground Ginger
- 1 teaspoon Celery Seeds
Instructions
Dry Out Pickles
- Slice the cucumbers and onion and place in a large bowl. Pour the salt over the mixture and toss to coat. Let sit for 1 to 2 hours in order to dry the ingredients out.
- Place the cucumbers and onions in a colander and rinse with cold water. Divide the mixture between the half-pint jars leaving 1/2-inch of space at the top of the jar.
Pickling
- In a large saucepan combine the white vinegar, apple cider vinegar, brown sugar, and pickling spices, bring to a simmer over medium heat, stirring until the sugar dissolved.
- Pour the vinegar mixture over the cucumber mixture and let stand at room temperature for 1 hour. Ladle ingredients out into half-pint jars leaving 1/2 of headspace. Store in an air-tight container in the refrigerator (or continue with canning next steps). Let cool for 24 hours before serving.
Canning (optional)
- Prepare the canner or hot water bath, jars, and lids according to manufacturers instructions. This usually involves bringing the hot water bath to boiling water and soaping and rinsing the jars and lids. Then place the lids in the hot water bath to warm before placing the hot pickle liquid in the jars.
- Pack the pickles into each jar leaving 1/2-inch headspace and pour the hot pickling liquid on top, not filling past the 1/2-inch headspace. Remove the air bubbles and wipe the rims. Center the lids on each jar and apply bands just until fingertip tight.
- Process in the boiling water canner for 15 minutes. Remove from the water and set on a towel to cool for 12 hours before removing the bands. For best flavor, allow the pickles to stand for 4 to 6 weeks.
Nutrition


Three ½ pint jars is 3 cups! Thinking you intended “3 pint jars” which is about right for that poundage of Kirbys.
David, you are correct! I will fix that typo now. Thanks.
Couldn’t eat these as the recipe was written, way to acidic. I reprocessed adding a cup of white sugar to the poured off brine and then put it back in the fridge for 24 hrs and they were fine.
Thank you for your feedback, Peggy! I’m sorry they were too acidic but glad you found a solution.
I used to make bread and butter pickles with my grandmother. This brings back so many memories. I don’t know how to can, but refrigerator pickles are right up my alley. Thanks for a great recipe!
Wow, those look really good; I love bread and butter pickles but have never tried making them. I’ve actually never canned anything either, I’m a little embarrassed to say. I think I might have to try making these soon!
Thanks, Rhianon! I really did just eat these straight from the jar and as for canning, I’m new too. Now that spring is here and our Farmers Market has opened though I can’t wait to try out some new recipes.
Yum! I love bread and butter pickles. Great photos!
Thanks Ryan! I’ve really been working on my photography so it’s nice to hear they look good.
I persronally hate pickles, but am saving the recipe for my husband! PS – Love the new blog look 🙂
My husband absolutely hates pickles so we’re in a similar situation. I’m happy enjoying them by myself though ???? Glad to hear you like the new look – it sure was a big project!!
This looks so good! Your pictures are amazing too!
Thanks Kelly! I shoot mostly in direct daylight, which I feel is key. Although, I did just order a special light to mimic the daylight glow so I don’t have to take my pics at the same exact time.