All Recipes
 Beverages
 Breakfast
 Appetizers
 Dinner
 Sides
Sides
 Dessert
 Videos
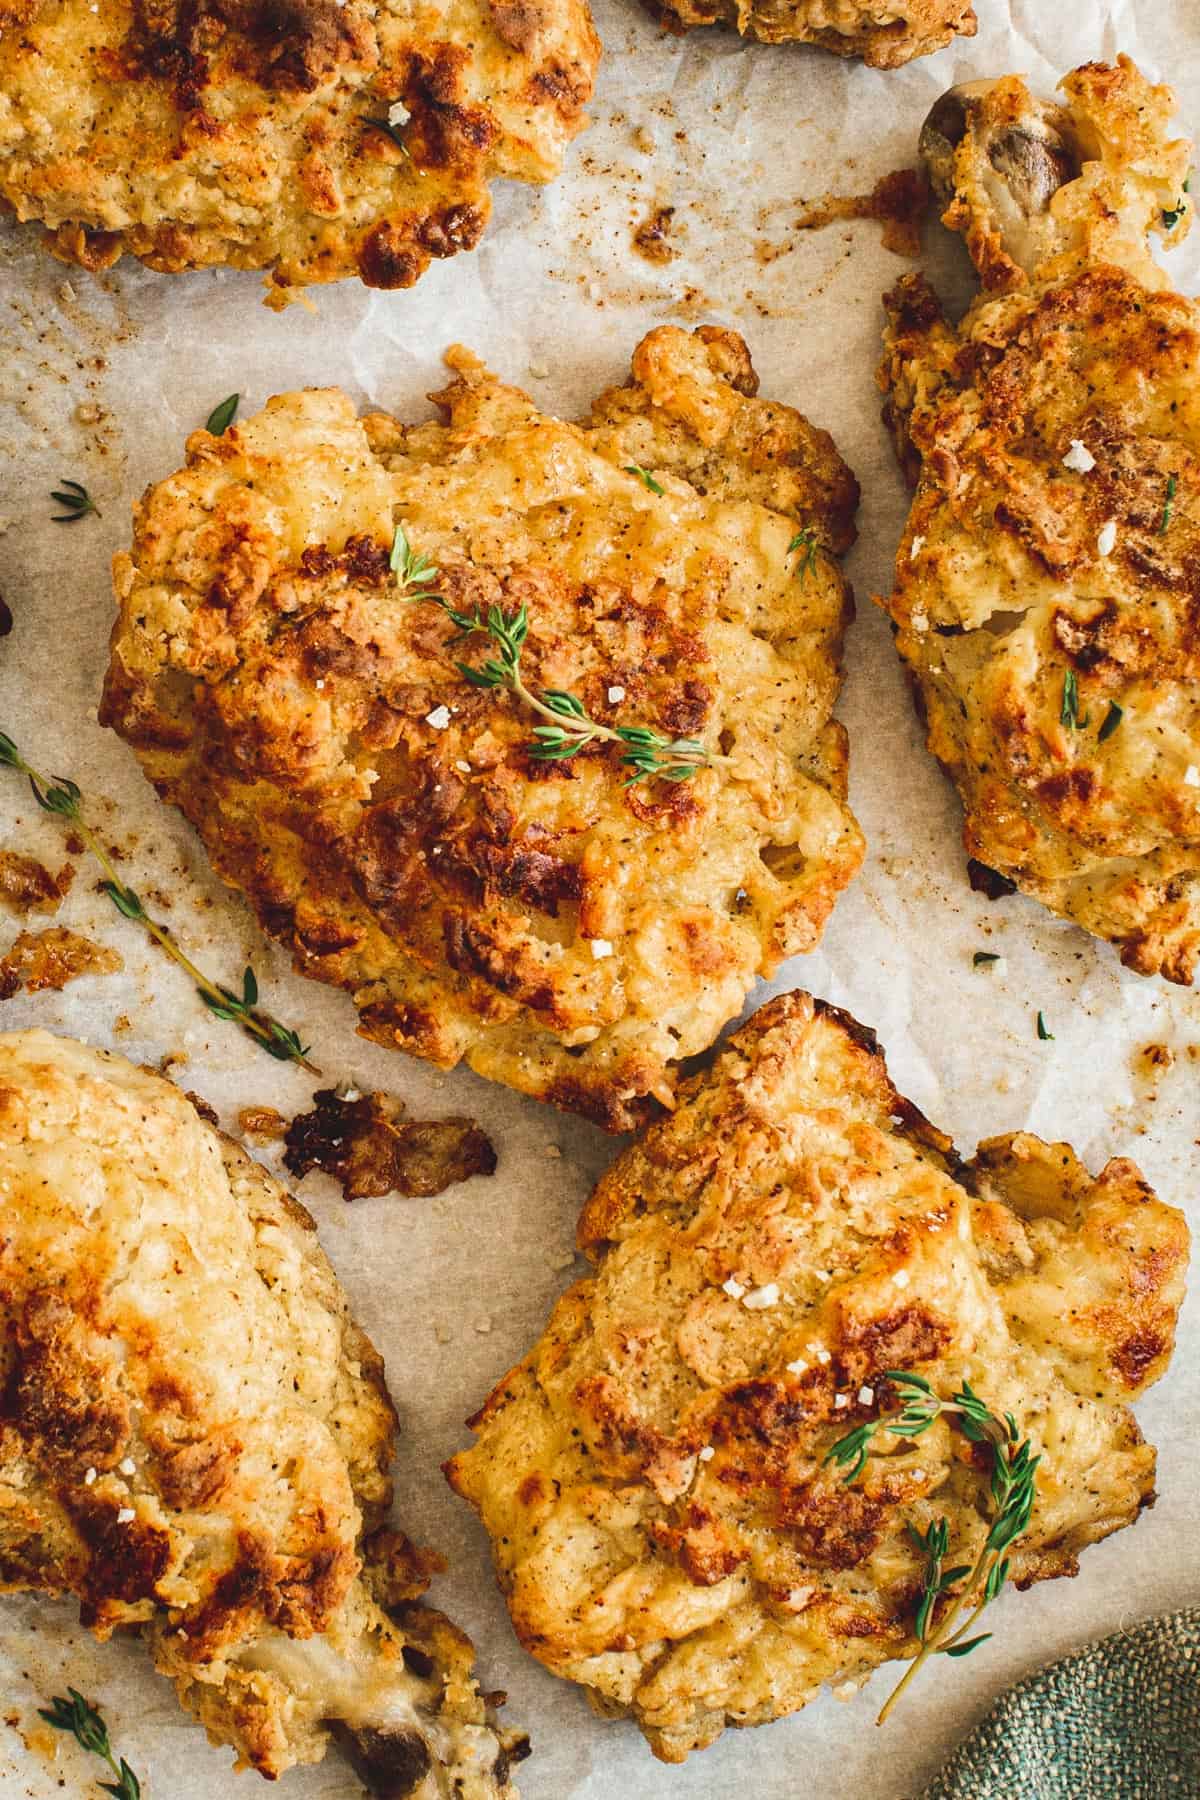
Enjoy the same tender chicken with a crispy and crunchy outer coating as the classic southern fried chicken, but without the frying mess. This easy-to-make Oven-Fried Chicken recipe is baked to perfection and no frying oil is needed. I’ve got both a boneless, which is perfect for sandwiches, or chicken and waffles and bone-in versions for a more classic option.
Ingredients Needed
Similar to classic fried chicken this version has a crispy outer layer. By adding cornstarch to your batter you can achieve that similar crispy, but a tad more healthy fried chicken. Cornstarch baked chicken is the secret.
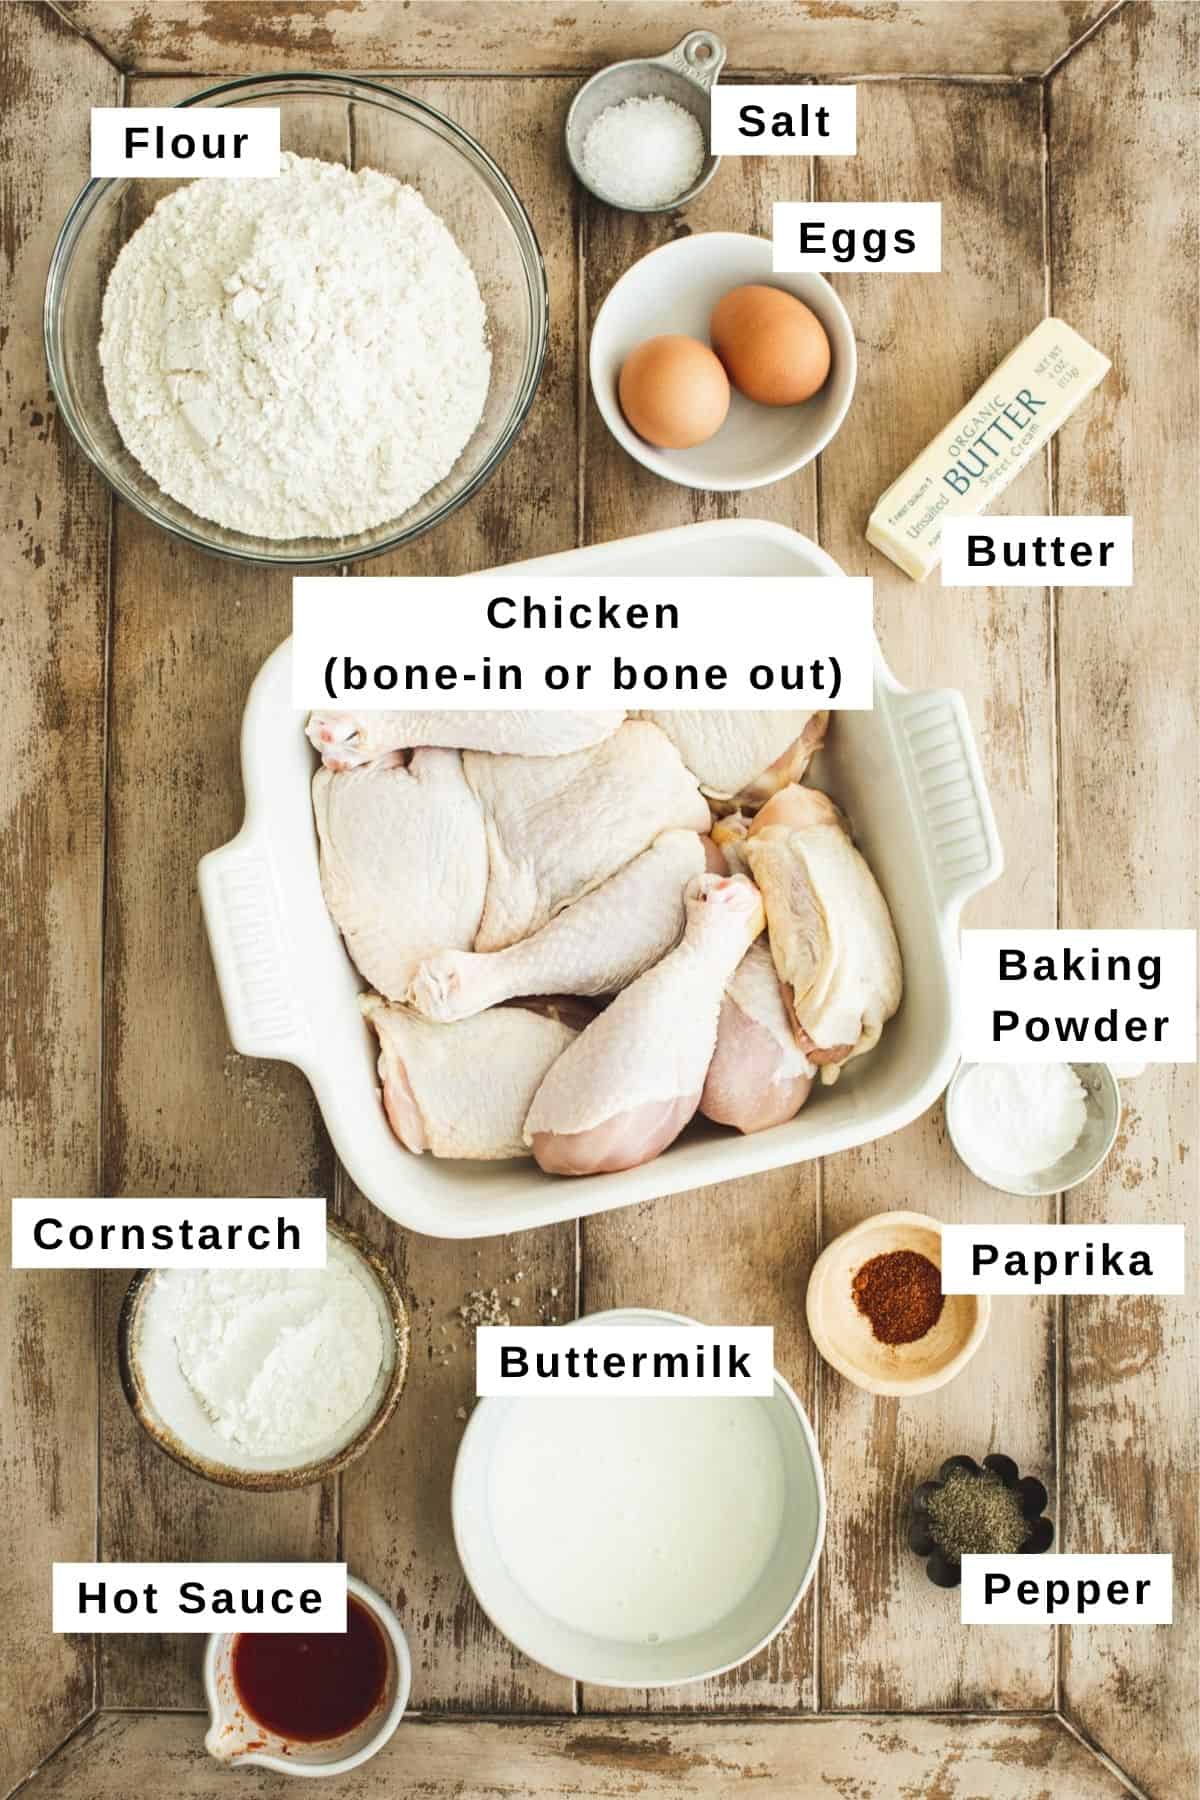
- Buttermilk: while it is not absolutely necessary to use actual buttermilk it is highly recommended because of its thickness and flavor. You can sour regular milk to create a similar flavor by adding 1 tablespoon of lemon juice per cup of milk and whisking it together for about 30 seconds.
- Hot Sauce: you can use more or less of the hot sauce in the marinade as well as add it to the buttermilk mixture you will be dredging the chicken in before cooking it. Sriracha will also work. The amount suggested in this recipe will not make your chicken spicy.
- Chicken: use your favorite chicken pieces for this recipe, but my preference is to use bone-in thighs and drumsticks for oven fried chicken. Both boneless and bone-in pieces will work and the size of each piece will determine the overall cook time.
- Flour: the flour I have found to work the best when frying is all-purpose flour or surprisingly measure-for-measure gluten-free flour. Either of these flour options mixed with cornstarch help to create the crispy breaded coating on the chicken.
- Cornstarch: Cornstarch is a key ingredient that helps create the crispy outer layer. Instead of cornstarch, you can use breadcrumbs, panko crumbs for extra crunch, mashed potato flakes, or crushed cornflakes if you’d like the outer breading to be a little sweeter.
How to Make Easy Oven Fried Chicken
I’ve found the best arrangement for preparing this chicken is to create an assembly line. Start with the marinated chicken pieces on a wire rack fitted on top of a baking sheet. Then divide the flour and cornmeal mixture into 2 flat bowls or pie dishes and place the buttermilk egg wash mixture in a bowl in between them.
The key is to start by dredging the chicken in the first flour and cornmeal mixture, then into the buttermilk egg wash, and again into the last flour and cornmeal mixture bowl.
Marinate
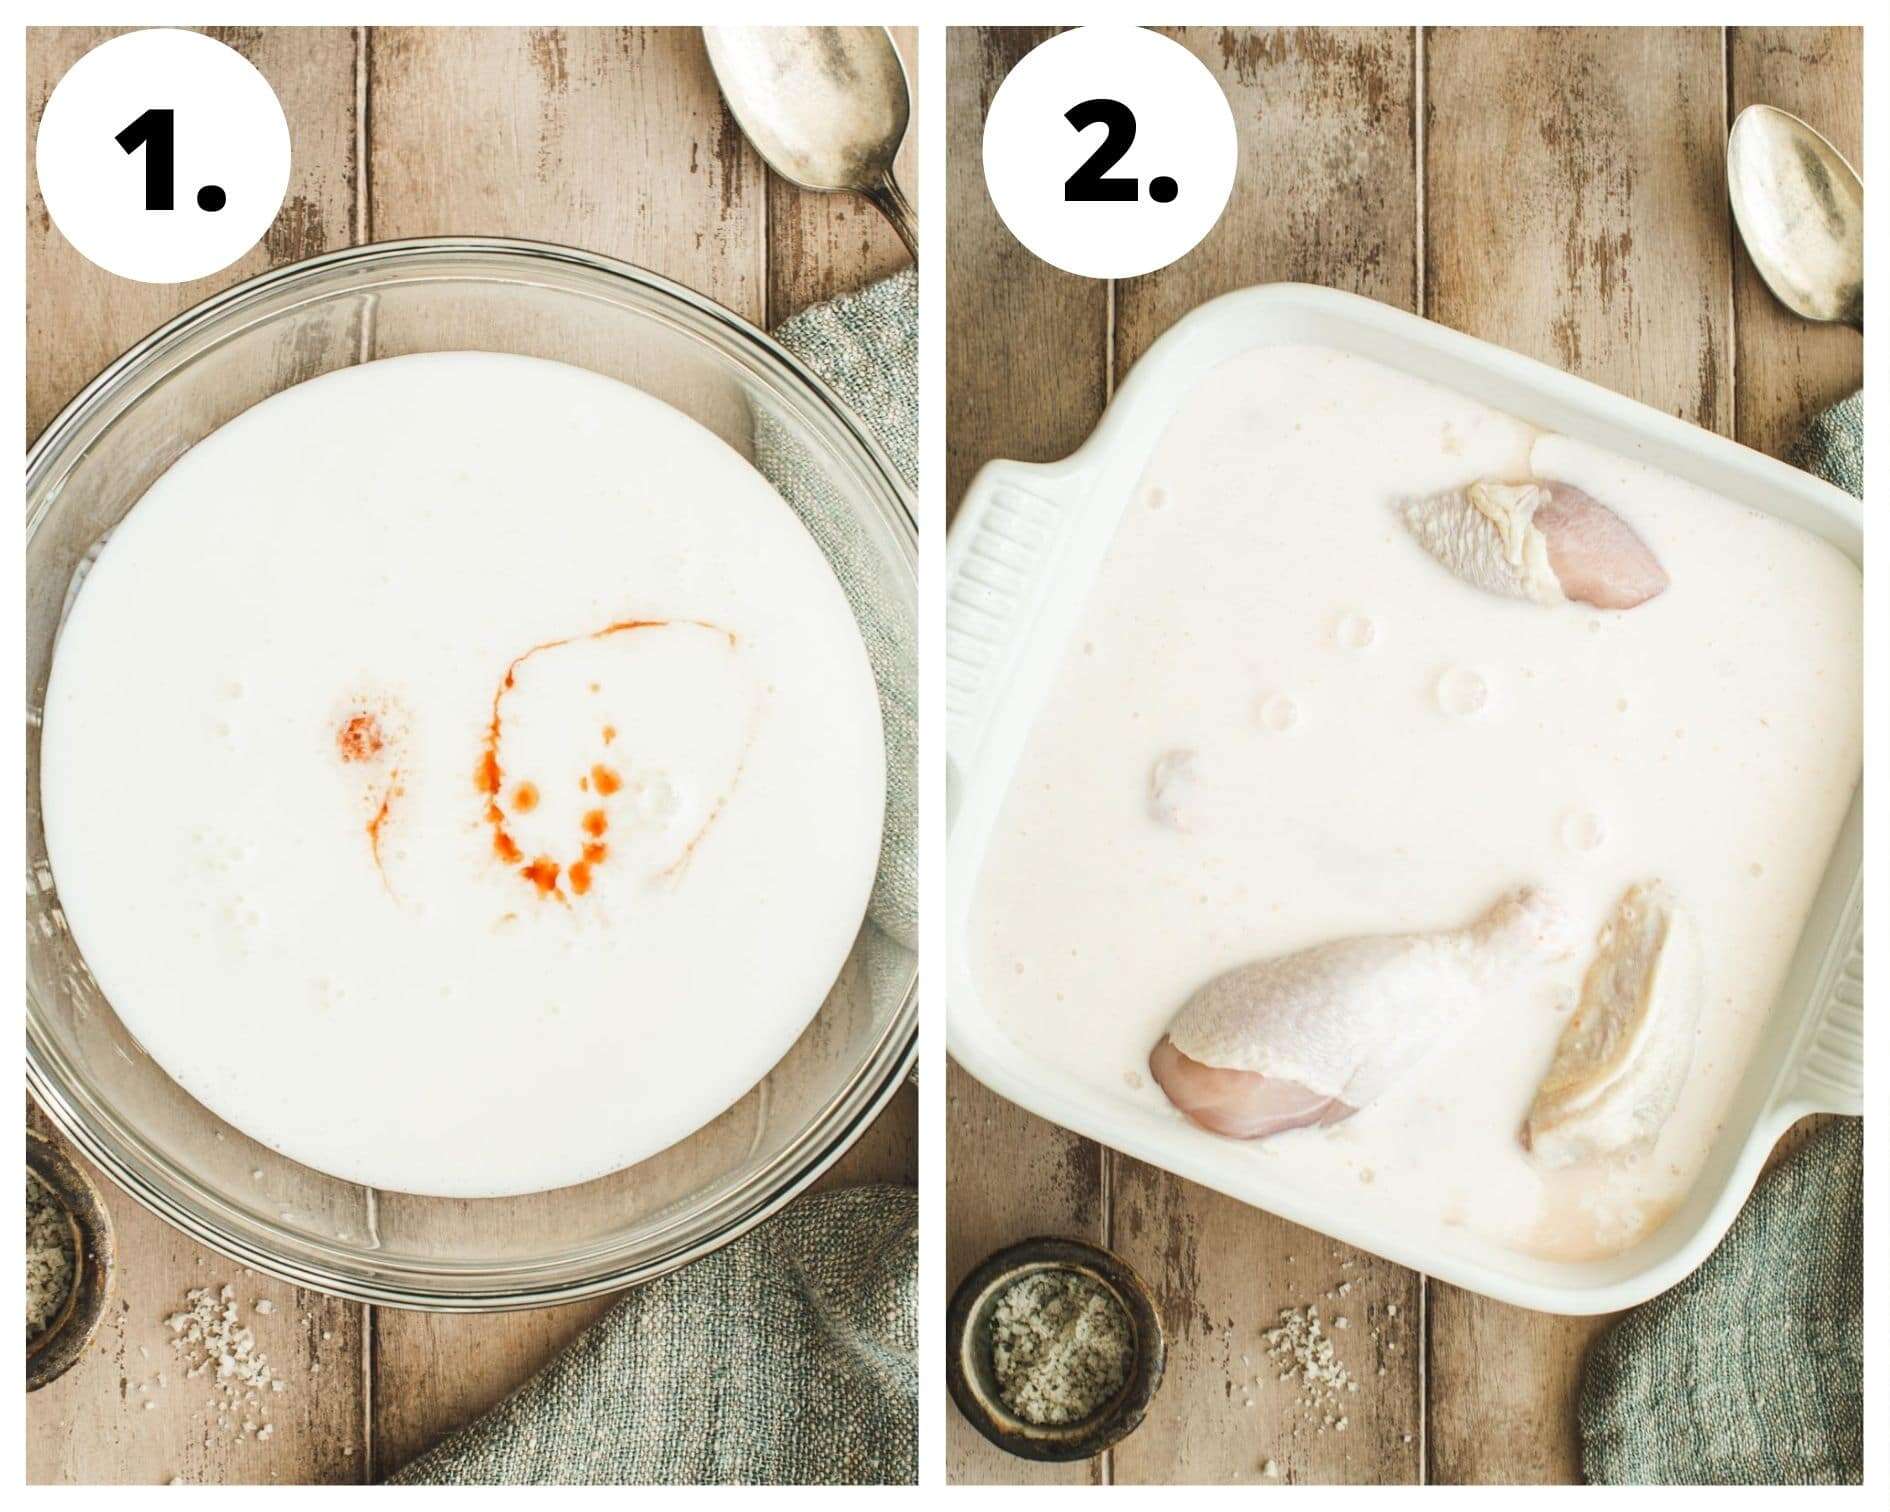
- Prepare the marinade. In a medium-sized bowl whisk the 3 cups of buttermilk, salt, and hot sauce together.
- Marinate the chicken. Place the chicken in a baking dish or gallon-sized zip-top bag and pour the buttermilk marinade on top. Cover with plastic wrap or release the air and seal. Put the chicken in the fridge for 30 minutes or up to 8 hours to marinate.
Prep
- Preheat the oven to 400ºF and line a rimmed baking sheet with parchment paper. Place the butter on top of the parchment and melt in the oven for 5 minutes prior to adding the battered chicken.
- Pat the chicken dry after removing it from the marinade using a paper towel or place the chicken on a wire rack fitted on top of a rimmed baking sheet.
Coat
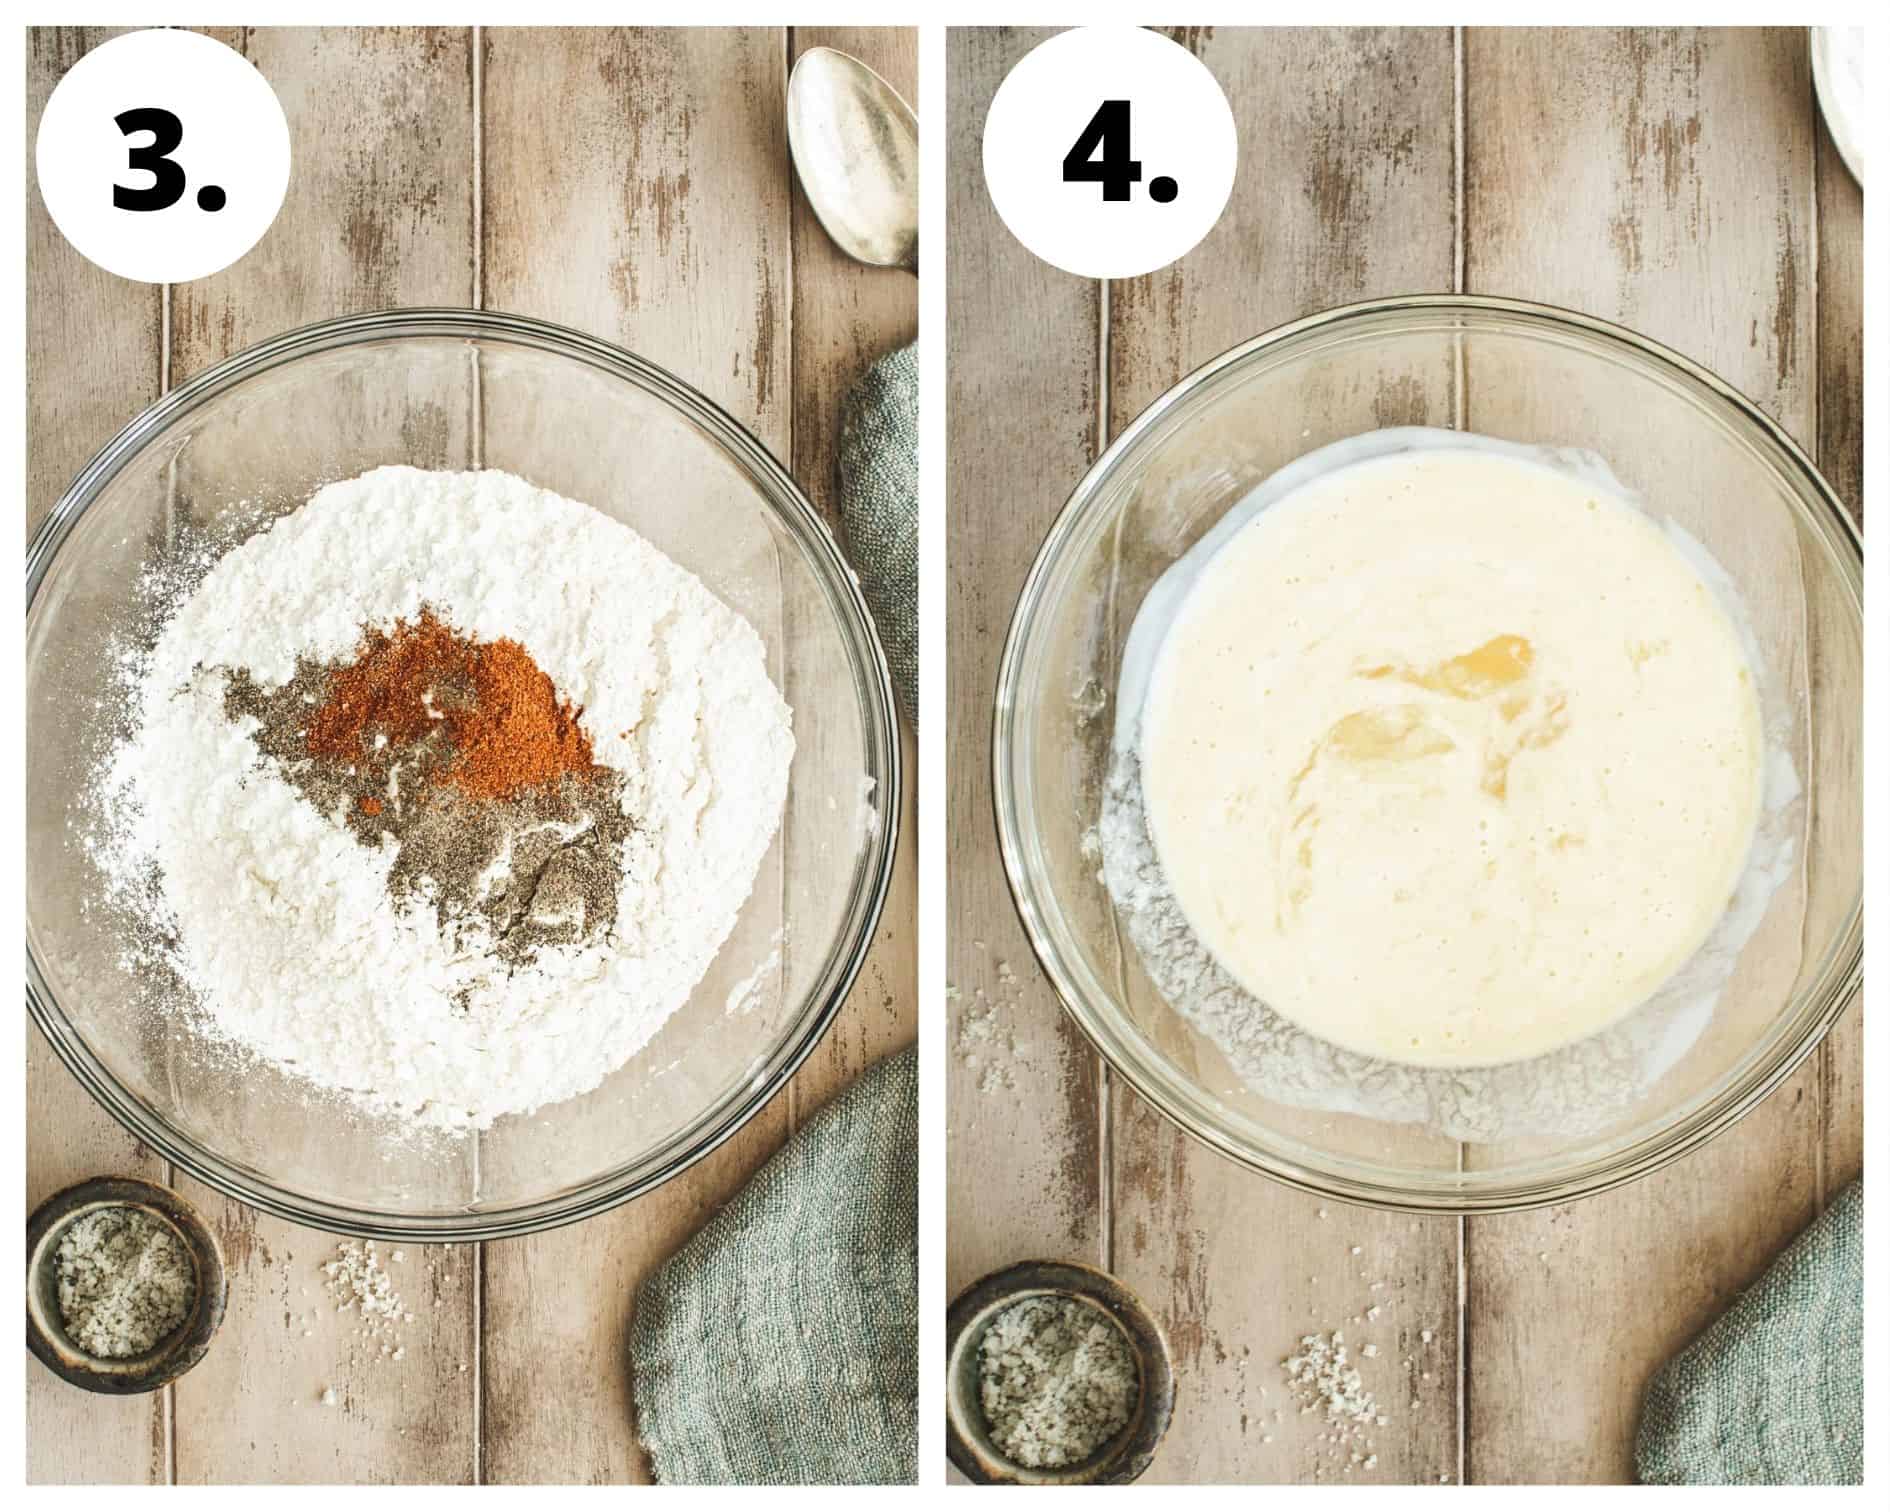
- In a large bowl or flat dish such as a pie dish, whisk the flour, cornstarch, baking powder, black pepper, and paprika together until fully mixed. Divide between 2 pie dishes or large bowls to make assembly easier.
- Beat the remaining buttermilk and eggs together in a separate medium-sized bowl and place it in between the 2 flour mixture dishes or bowls.
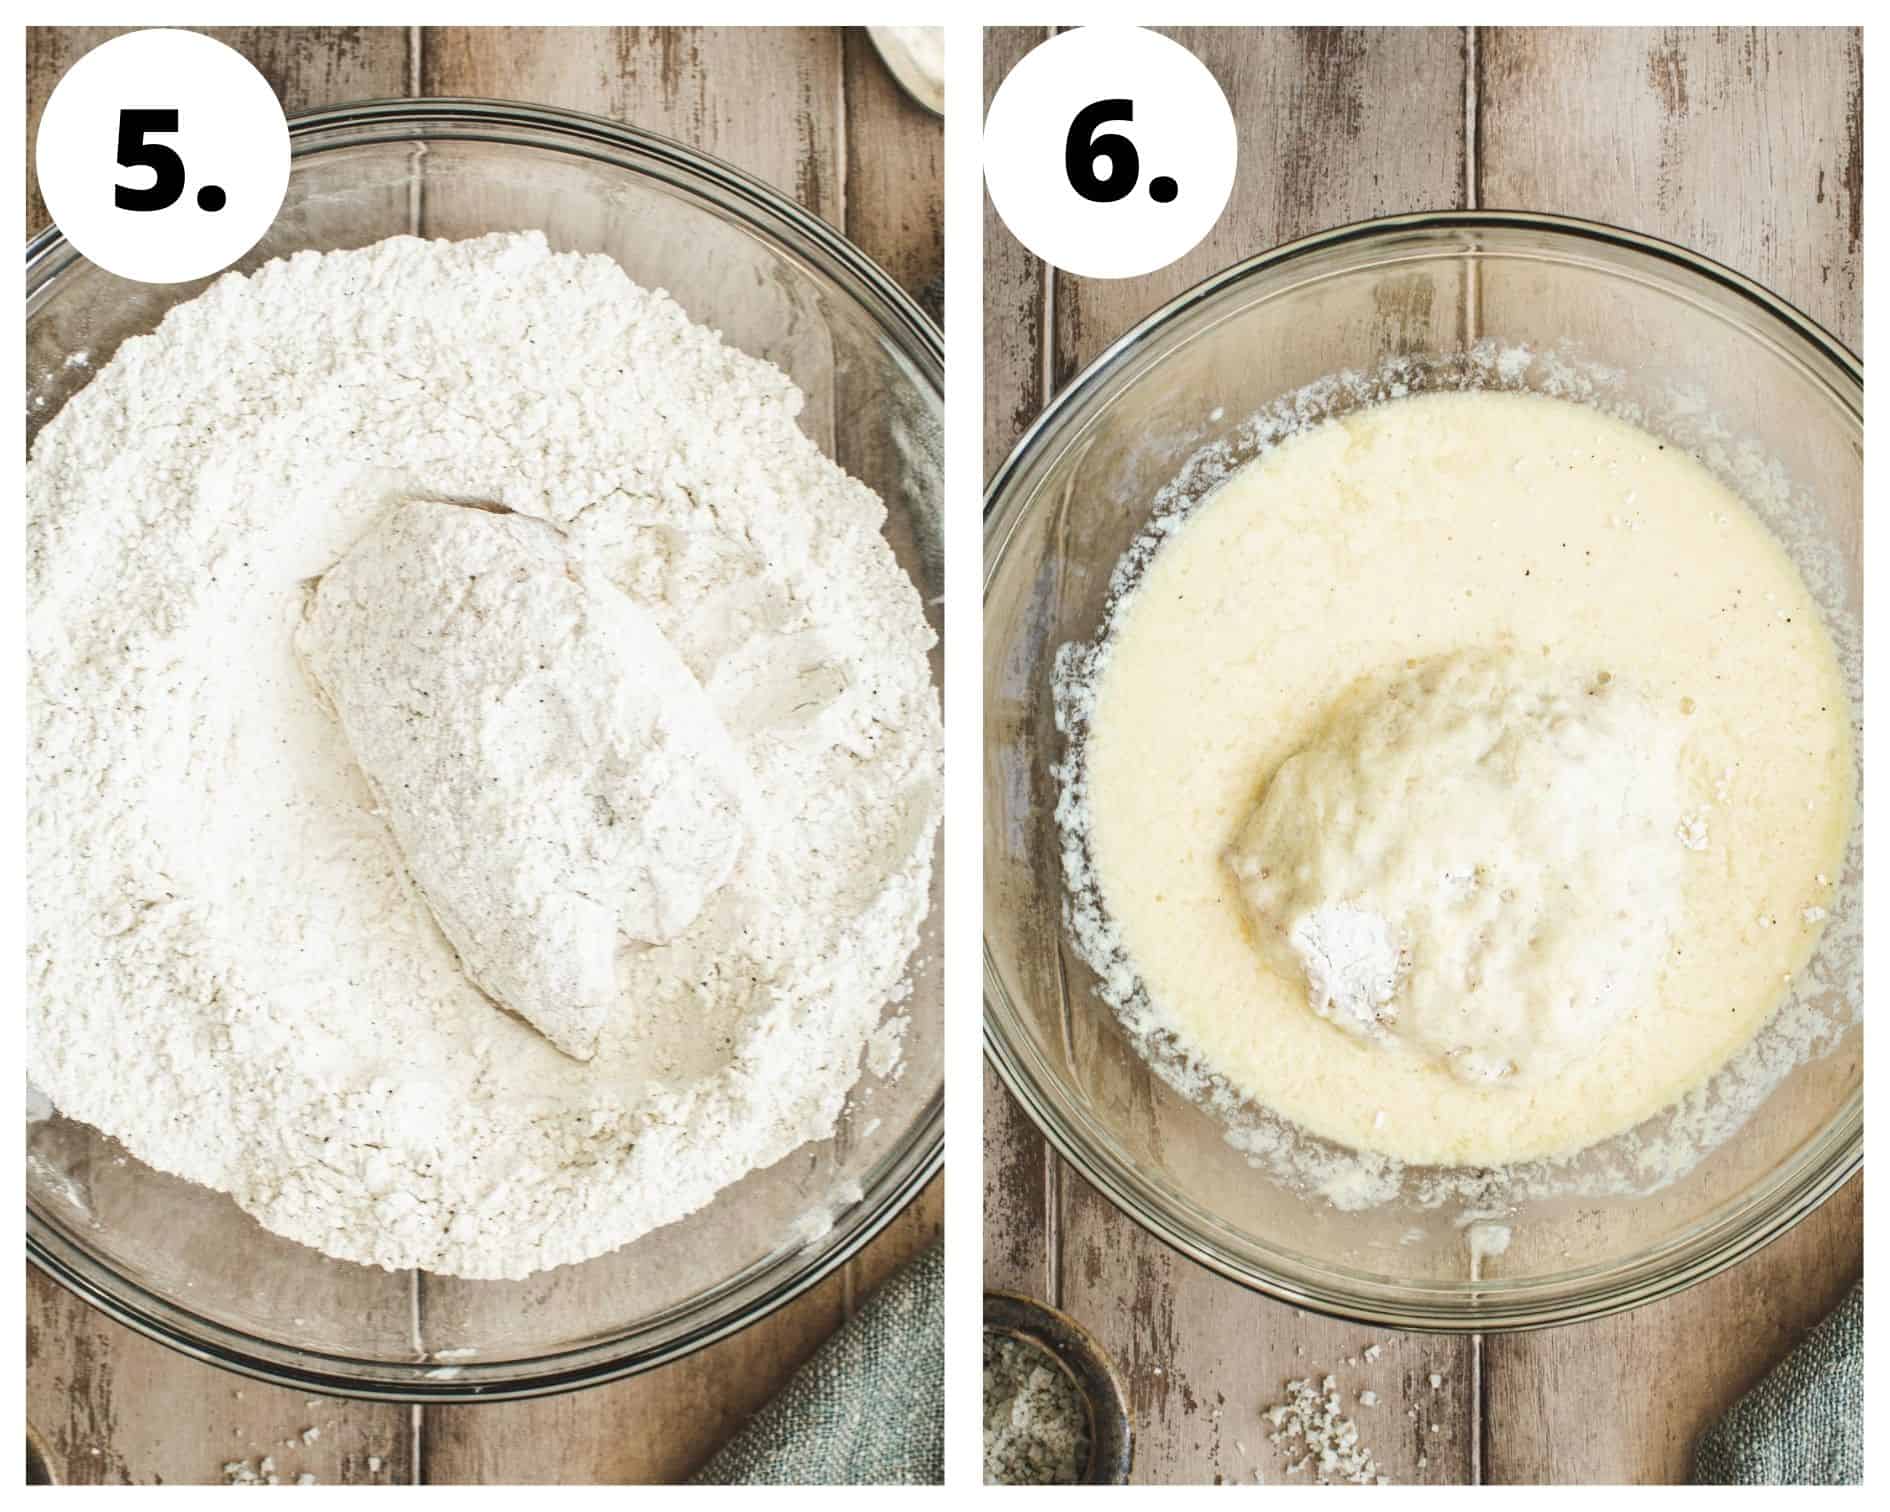
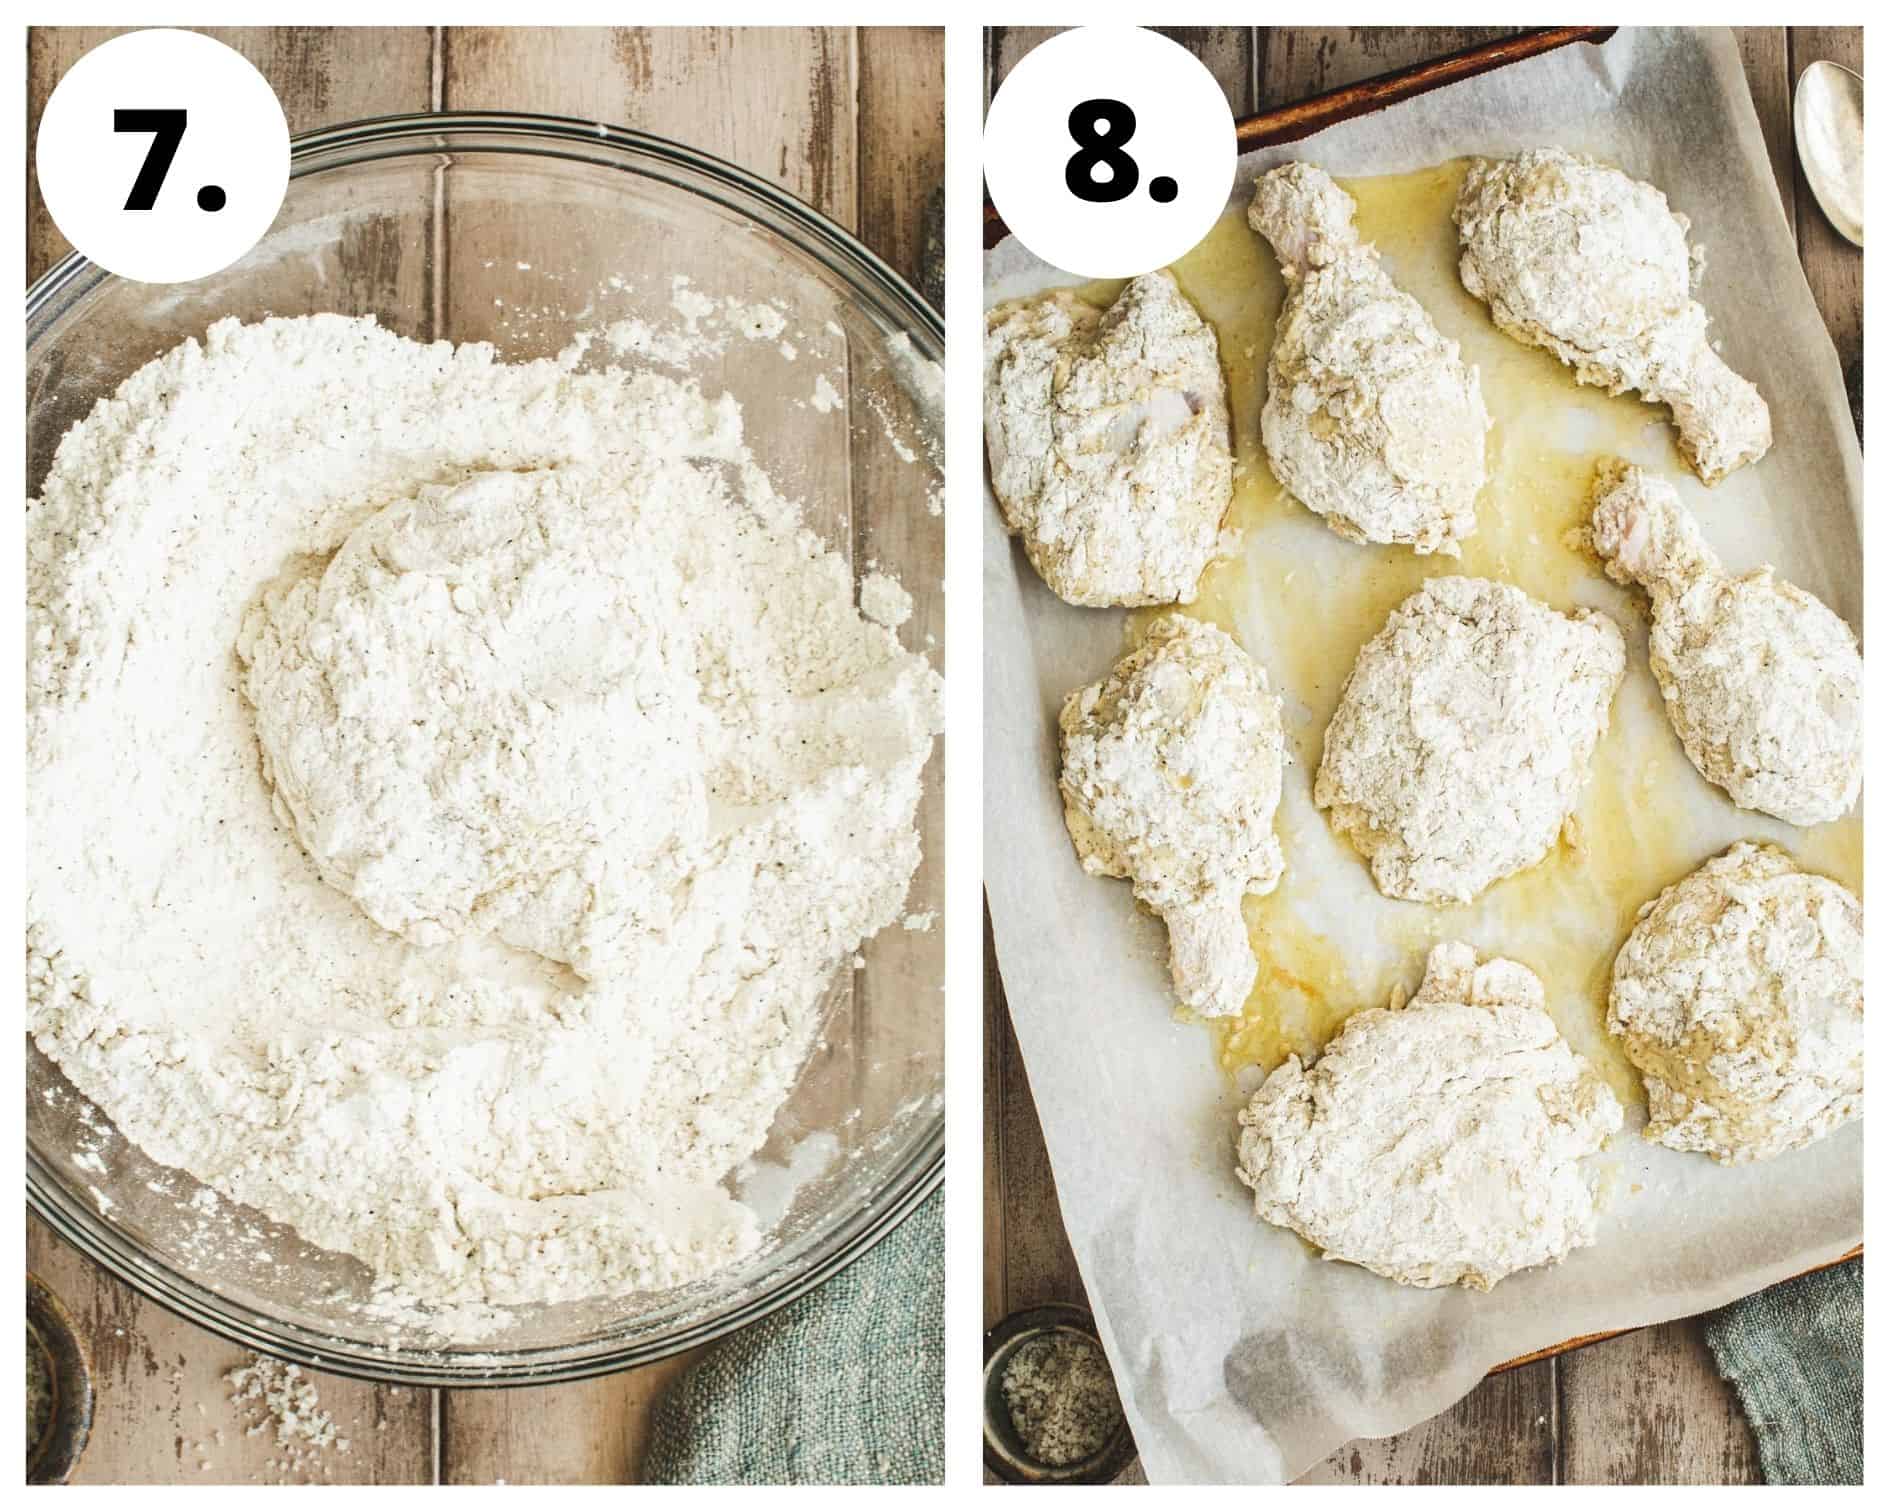
- Coat the chicken one piece at a time. First, place the chicken in the flour mixture and then dredge it in the buttermilk egg wash coat it all over, and then back into the last flour mixture.
- Arrange the pieces of chicken on the prepared baking sheet with plenty of space in between.
Bake
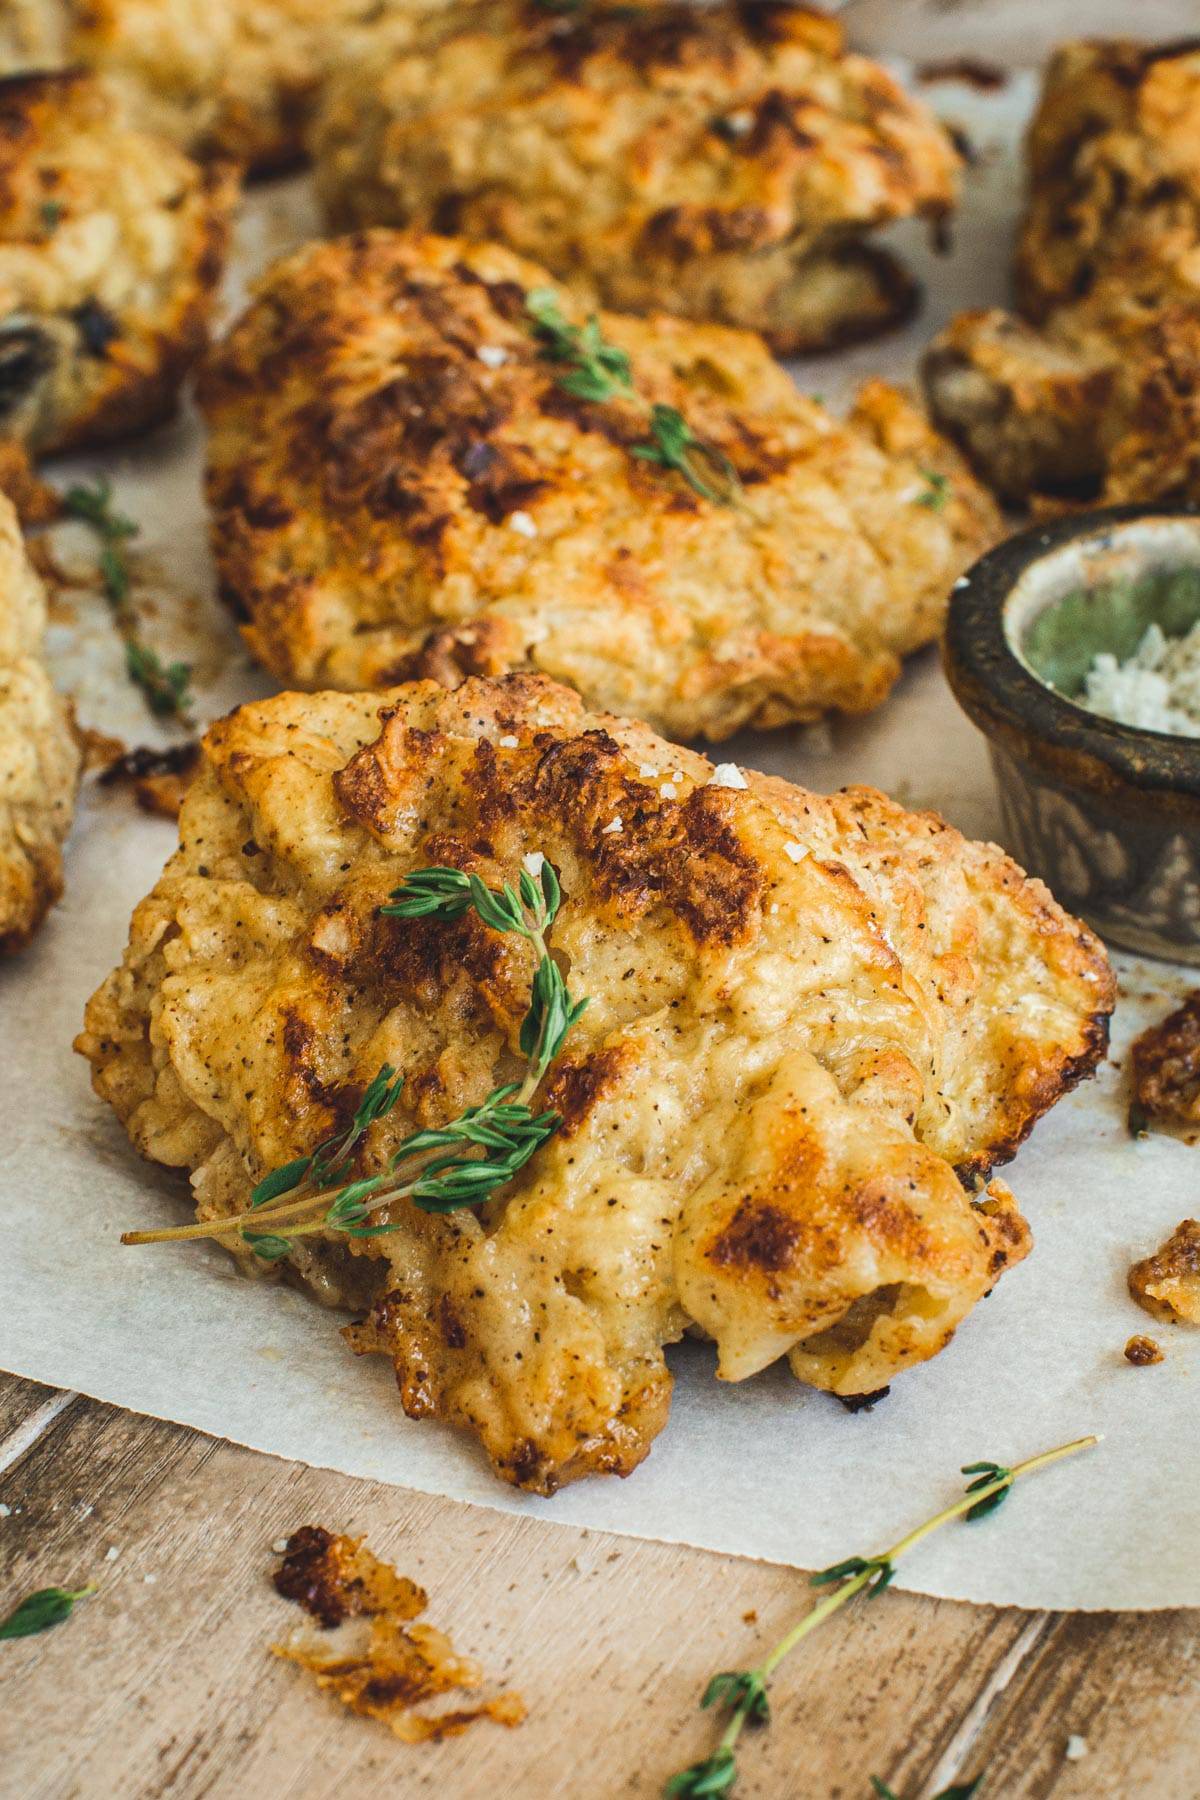
- Bake the chicken for 25 minutes and then use rubber tongs to flip the chicken to the other side to bake for an additional 20 minutes. The internal temperature of the chicken should reach 165ºF.
- For extra golden brown chicken turn the oven to broil for an additional 30 seconds to 1 minute at the end of the cooking time (be sure to watch it though so the outer coating doesn’t burn).
PRO TIP: To keep the batter from pulling away from the chicken when you flip it, first add some additional pats of butter to the parchment. Then use rubber tongs or a spatula to carefully loosen and slide it from the parchment paper before flipping it. If you use metal tongs to grab it quickly the breading might fall off.

Make Ahead Instructions
You can prepare this chicken up to 2 days in advance of when you plan on serving it and then reheat it, however, it’s best served fresh. To make it ahead and keep it fresh you can marinate and then coat the chicken in the breading followed by flash freezing. Then store it in the freezer until you’re ready to bake it completely.
Storage and Freezing Information
To freeze the oven fried chicken you will need to flash freeze it first, which will allow you to then place all the chicken in the same container without it sticking together and freezing together. Place the leftover chicken on a baking sheet and put it in the freezer for 1 hour. Then the chicken will be frozen enough to place in a freezer-safe container or bag and sealed. It will last for up to 3 months in the freezer.
Reheat Leftovers
Eating this oven fried chicken fresh is personally my favorite, but there are also times when we have leftovers. For those times I use this method to reheat the chicken.
- Preheat the oven to 425ºF and spray a wire rack with cooking spray and fit it on top of a rimmed baking sheet. Heat the baking sheet and wire rack in the oven for 5 minutes.
- Remove the baking sheet from the oven and set the chicken pieces on top. Heat the chicken for 5 minutes, flipping it to the other side halfway through. Note: When you flip the chicken use rubber tongs or a spatula to carefully slide underneath the chicken. If you pull it quickly the breading will come off.
- To get a little extra crisp, set the oven to broil for 30 additional seconds (be sure to watch the chicken as you do this because it can easily burn the outer coating).
Recipe Notes and Expert Tips
- If you choose to use bone-in pieces of chicken the batter may separate on some of the pieces when you flip it during cooking, but if placed on parchment paper this will help prevent that from happening.
- Chicken breasts may need to be flattened or cut in half. If you plan on using chicken breasts for this recipe place the breasts into a Ziplock bag and let out the air before sealing. Then use the flat side of a kitchen mallet or a rolling pin to beat the thick side down so it’s more even with the smaller side.
- Smaller pieces work better than larger chicken pieces. In the case of oven-fried chicken, the breading tends to stay on the smaller chicken pieces better.
FAQs
Yes! I’ve made this oven-fried chicken recipe using a measure-for-measure gluten-free flour many times and it’s absolutely delicious and just as crispy and crunchy as the original version.
You can prepare this oven-fried chicken up to 2 days in advance of when you plan on serving it. Then follow the directions above for reheating it so it remains crispy.
Many factors contribute to the skin not being crispy. The main reasons are not drying the skin before placing it in the batter and not placing the pieces of chicken on parchment with melted butter on it.
When making oven-fried chicken the pieces of chicken should be placed skin side up.
Tough baked chicken wings can result from overcooking, high temperatures, insufficient moisture, trimming too much fat, incorrect cooking times, overcrowding the baking pan, low-quality chicken, and not allowing them to rest after cooking. To avoid toughness, be cautious about cooking time and temperature, use flavorful sauces for moisture, maintain the chicken’s natural fat content, and ensure they are cooked to an internal temperature of 165°F.
Helpful Equipment
- 2 Rimmed Baking Sheets and Wire Rack: you’ll need one baking sheet for cooking the chicken and one fitted with the wire rack for prepping the chicken.
- Parchment Paper: I have tried preparing this version of fried chicken many times and the best way to keep the breading on the chicken during the cooking process is to use parchment covered in melted butter.
- 2 Pie Dishes: This helps to coat the chicken in the batter.
- Rubber Tongs: these are helpful when flipping the chicken over during the baking process. Rubber tongs help to slide the chicken off the parchment as opposed to pulling it off and ripping the coating off the chicken.
- Instant Read Thermometer: the temperature of your oven will depend on how long the chicken needs to cook, but using an instant-read thermometer helps figure out when your chicken is fully done.
Serving Ideas
- Chicken and Waffles
- Chicken Sandwich
- Serve it with sides. Some of my favorite ways to enjoy this oven fried chicken recipe are with baked beans and mashed potatoes with truffle, and of course some banana pudding.
Why You’ll Love This Recipe
- No frying mess. If you’ve ever wondered how to make fried chicken in the oven without all the mess of frying it then this is the recipe for you. Baked fried chicken is easy to make and still has the same crispy breaded coating.
- Just like KFC baked chicken. This version is identical to homemade fried chicken, and similar to that of KFC. I’ve also written down all of my tips and tricks to help you also make the best KFC baked chicken
- Super versatile. customize it to fit your dietary needs such as gluten-free or dairy-free. You can also make it boneless, which is great for chicken sandwiches or Chicken and Waffles, or you can make it bone-in for a more traditional Southern oven fried chicken.
Process Notes
- Create an assembly line. Arrange the pieces of chicken on a wire rack fitted on top of a baking sheet after it has marinated, which will allow the marinade to drip off.
- Pat the chicken dry after marinating it. If you don’t plan on using the wire rack on top of the baking sheet pat the chicken dry and then lay it on a paper towel-lined plate or cutting board before placing it in the first bowl of batter. This keeps the batter from sliding off during the cooking process.
Tips for Extra Crispy Chicken
- Coat the chicken 3 times. Dipping the chicken 3 times creates a thick outer coating.
- Use parchment paper and a dark, non-stick pan. The parchment paper with butter on top keeps the chicken from sticking to the pan and placing it all on top of a dark pan helps with the crispiness.
- Melt the butter on the parchment before adding the chicken. Since we’re trying to get crispy chicken you will need to use butter instead of cooking spray.
- Boneless works better than bone-in chicken. My preference is to use bone-in chicken pieces, but boneless tends to work better for oven-fried chicken. The breading tends to stay on the boneless pieces easier.
- Serve immediately. While you can make this chicken ahead of time it is best served immediately from the baking sheet.
Related Recipes

Oven-Fried Chicken Recipe
Equipment
- Wire Rack
- Rimmed Baking Sheet (2)
- Parchment Paper
- Flat Bowls or Pie Dishes
- Rubber Tongs
Ingredients
- 2 lbs Chicken Pieces bone-in or boneless and skinless
- 4 tablespoons Butter may need more for cooking
Marinade
- 3 cups Buttermilk
- 1/8 cup Salt
- 1 tablespoon Hot Sauce optional
Batter
- 3 cups Flour
- 1/3 cup Cornstarch
- 2 tablespoons Baking Powder
- 1 tablespoon Ground Black Pepper
- 1/2 teaspoon Paprika
- 1 cup Buttermilk
- 2 Eggs
Instructions
Marinate
- In a medium-sized mixing bowl whisk the 3 cups of buttermilk, salt, and hot sauce (if using) together.
- Place the chicken pieces in a baking dish or in a gallon-sized Ziplock bag and pour the buttermilk marinade on top. Cover the baking dish or seal the bag and place it in the fridge to marinate for 30 minutes up to 8 hours.
Prep
- Preheat the oven to 400ºF and line a rimmed baking sheet with parchment paper.
- Place the butter on the prepared baking sheet and place it in the oven to melt for 5 minutes.
- Remove the chicken from the marinade and set it on a wire rack fitted on top of another baking sheet or sit it on top of a paper towel-line cutting board.
Coat
- In a large mixing bowl or pie dish whisk the flour, cornstarch, baking powder, ground pepper, and paprika together (to make the coating process easier divide the flour mixture between two pie dishes).
- In a separate medium bowl beat the remaining 1 cup of buttermilk and eggs together.
- Take one piece of chicken at a time and dredge it into the flour mixture first making sure to coat it completely, then dunk it into the buttermilk egg wash, and back into the flour mixture.
- Remove the prepared baking sheet from the oven and arrange the chicken with plenty of space in between each piece.
Bake
- Bake for 25 minutes and then carefully flip the chicken over using rubber tongs and bake for an additional 20 minutes. The internal temperature of the chicken should be 165ºF.
- For an extra brown outer layer set the oven to broil and cook for 30 seconds to 1 minutes. Make sure to watch the chicken so it doesn't burn.
Notes
- If you choose to use bone-in chicken the batter may separate on some of the pieces when you flip it during cooking, but if placed on parchment paper this will help prevent that from happening. Even if this happens it will still be delicious and crunchy!
- Chicken breasts may need to be flattened or cut in half. If you plan on using chicken breasts for this recipe place the breasts into a Ziplock bag and let out the air before sealing. Then use the flat side of a kitchen mallet or a rolling pin to beat the thick side down so it’s more even with the smaller side. Alternatively, you can cut the breasts in half to get smaller pieces.
- Smaller pieces work better than larger chicken pieces. This isn’t the case with regular fried chicken because of how quickly the batter crisps up in the hot oil, but in the case of oven-fried chicken, the breading tends to stay on the smaller chicken pieces better.
Process Notes
- Create an assembly line. Arrange the chicken on a wire rack fitted on top of a baking sheet after it has marinated, which will allow the marinade to drip off.
- Pat the chicken dry after marinating it. If you don’t plan on using the wire rack on top of the baking sheet pat the chicken dry and then lay it on a paper towel-lined plate or cutting board before placing it in the first bowl of batter. This keeps the batter from sliding off during the cooking process.
Tips for Extra Crispy Chicken
- Coating the chicken 3 times is key. First, the chicken is patted dry and then dredged in the flour and cornmeal mixture, then dunked into the buttermilk egg wash, and back into the flour and cornmeal mixture. This creates a thick outer coating.
- Use parchment paper and a dark, non-stick pan. The parchment paper with butter on top keeps the chicken from sticking to the pan and placing it all on top of a dark, non-stick pan, which heats to a high temperature than a light-colored one helps with the crispiness.
- Melt the butter on the parchment before adding the chicken. Since we’re trying to get crispy chicken you will need to use butter instead of cooking spray. Place the parchment onto your baking sheet and then melt the butter on top before placing the chicken onto it. Then before flipping the chicken place some additional butter around the chicken on the parchment.
- Boneless works better than bone-in chicken. My preference is to use bone-in chicken pieces so it’s closer to what you’d get at KFC or Popeye’s chicken, but boneless tends to work better for oven-fried chicken. The breading tends to stay on the boneless pieces easier, but also it stays on the smaller pieces better so cut large breasts into for better results.
- Serve immediately. While you can make this chicken ahead of time (directions on how to make it ahead are written above) it is best served immediately from the baking sheet. If you’re not quite ready to place the chicken on plates after it’s done cooking leave it on the parchment-lined baking sheet otherwise the bottom part could get soggy.